CSP Plus Properties Support Section |
Compliances
The Compliance Tracking feature is a critical component of the CSP Plus Software Application. The Compliance feature is designed to send notification for anything that could potentially expire. This could apply to employee training and certification, Property testing, etc.
The CSP Plus system will notify to the email address entered of a compliance’s impending expiration.
Compliance Main Screen
This Compliance Screen shows all of the Compliances that the Property has assigned to them.
Legend
| Flags | Files | Misc |
 Compliance is Expired Compliance is Expired |
 Download File Download File |
 Never Expire Never Expire |
 Compliance has a Warning Compliance has a Warning |
 Add File Add File |
 Renew Compliance Renew Compliance |
 File History File History |
 Revoke Compliance Revoke Compliance |
Add Compliance
- Click Add Compliances

- Visible now is a list of Compliance Types created from the Admin Tools (If not click here for more help)
- Date Obtained
- Use Calendar to select date or enter in manually
- In this format (Month/Date/Year - 10/18/2011)
- Date Expired
- Use Calendar to select date or enter in manually
- In this format (Month/Date/Year - 10/18/2011)
- No Expiry
- This is used for Certifications with no Expiration Date.
There are no Compliance Emails associated with a No Expiry Compliance – it will show NEVER
- This is used for Certifications with no Expiration Date.
- File Number
- This can be used for anything related to the Compliance Entered, this is just a way to show the number associated with the Property
- i.e. - Driver's License Number, First Aid Certificate Number
- This can be Changed at any time
- This can be used for anything related to the Compliance Entered, this is just a way to show the number associated with the Property
- Green Check Mark
 Shows the Compliance has been entered

Save Compliance
- Click the Save Complance Button

Update Compliance
- Click in the Box for the Compliance to be edited - You will get a Cursor

- The Date can be manually edited
- The Calendar can be used to select a new Date
-
- In this format (Month/Date/Year - 10/18/2011)
 No Expire
- This is used if a Certification has a Date Obtained but not an Expiry Date - Will show NEVER
- To Save
- Click the Save Compliance Button
- Click the Save Compliance Button
Renew Compliance
If a Compliance is already Listed - Clicking the Renew Button Will bring up the Add Compliance Page for the Compliance selected. This will NOT update the Compliance BUT WILL make a NEW Compliance and keep the OLD one in the Compliance list.
- Click Renew Button
- See Add Compliance for more help
Revoke Compliance
If a compliance is no longer required it can be Revoked (deleted) at any time.
- Click the Revoke Button
- A Warning Box will appear
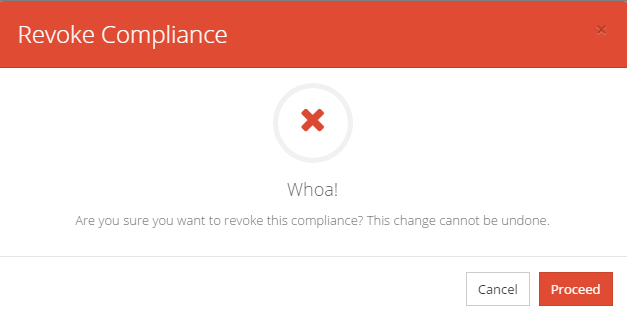
- Click Proceed
- Are You Sure You Want To Revoke This Compliance?
- Yes- Will Revoke it
- Reason For Revocation:
- The system requires a Reason for Revoking the Compliance. An Audit Trail is attached to the Revoke for future Admin Audits
- Reason For Revocation:
- Disable From Recurring -
- If this compliance had a Recurring setup it will stop it if you put a checkmark here
- Cancel - Won't Revoke Compliance
- Click Revoke Complance Button
- Yes- Will Revoke it
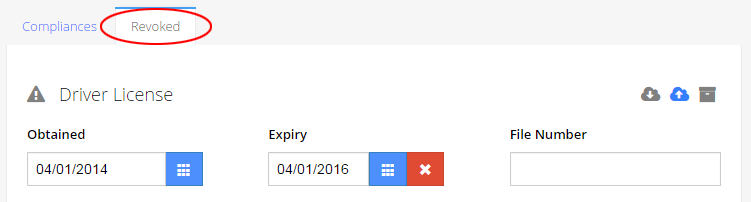
Show Revoked Compliances
Once a Compliance is revoked it will be shown under the Show Revoked Compliances TAB. There is still ACCESS to any files that uploaded to the Compliance for future reference.
To go back to Current Compliances - Click the Show Current Compliances TAB
Flags
- Compliance is Expired - Based on the Expiration Date on the Compliance
- Compliance has a Warning - Based on the Days Prior To Expiry For Notification that was set in the Admin Tools - Compliance Types.
Recurs
This feature allows the Compliances to be set up and Update Automatically either:
- Daily
- Weekly
- Monthly
- Yearly
This feature will allow you to set up any notification based on a specific date, and not have to re-enter it every week, month or year.
To set this up go to Admin Tools - Compliance Types
Update Compliance Recurrence
- Make sure there is ONLY ONE Compliance Name to add the New Recurrence to.
The example below shows that the Company has entered a recurring Annual Test on the Saw. The next 2 entries will need to be REVOKED (and any additional entries), because if kept in the system they will have the Recurrence on them as well.
Note, if there is only one compliance, you don't need to REVOKE it.
Annual Test on SAW - Obtained 11-01-2010 Exp 11-01-2011 - KEEP
Annual Test on SAW - Obtained 11-01-2011 Exp 11-01-2012 - REVOKE
Annual Test on SAW - Obtained 11-01-2012 Exp 11-01-2013 - REVOKE
To See if Compliance Recurrence is Active
- Go Compliance Tab
- On the Compliance the Recurrence is Added to, there will be a BLUE Bar under it that will say "Recurs every ___ ___ after the expiry".
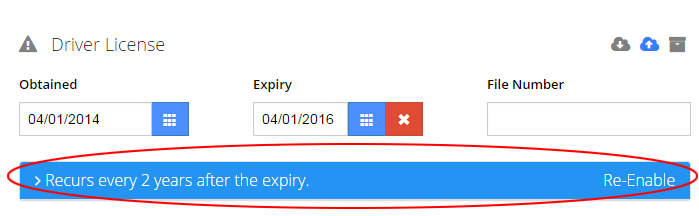
To Disable/Re-Enable the Recurrence from the Compliance
- Click the Disable Link from the Compliance Tab for the relevant Compliance
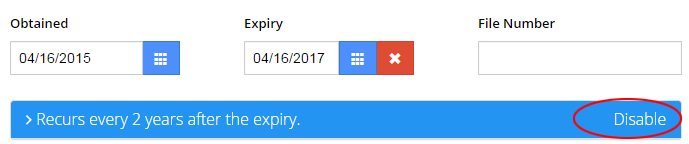
- Click the Re-Enable Link from the Compliance Tab for the relevant Compliance
There will be a warning Button to Re-Enable the recurrence
Add File
Each Compliance can have an actual copy of a file (i.e. a driver’s license) attached to it in PDF, JPG, DOC Formats
- Click the
- Next a new window will show with DROP FILES TO UPLOAD
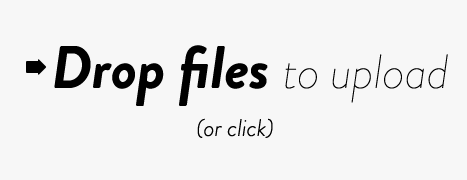
- Either Drag your File to this box
- Or Click this box
- Find your file on your computer
- File Name
- Please name your file before you upload it - as you will not beable to change the File name once uploaded
Download File
This will either Open the File with the appropriate program or save it to a file location on the computer.
- Click the
- A Window will appear; follow the instructions (this depends on the Computer and Browser you are using)
Archive a File
Any compliance file can be archived. It will be put into the archive folder for that compliance and saved on CSP Plus. At any time the file can be viewed.
- By Clicking the
- Adding a new file it will be automaticlly Saved the old File in the Archived Files
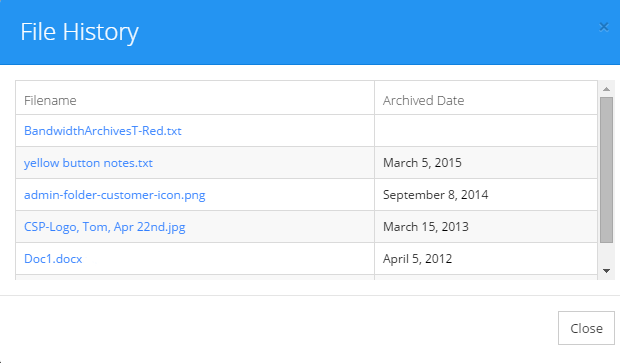
View Archived Files
Once a file is Archived it will be permanently stored.
- Click the
- The File Name and Archived Date will show (Multiple files can be viewed showing the date they were Archived)
- Click the File you would like to download to your Device